HomeBrewGr
How To Mod Asus A8N-Sli Voltage Chipset
This guide is for Asus A8N-Sli (first edition). Is the chipset vmod and it allows for more voltage to be sent to the chipset.
Note
These pictures are not from me. I decided to make this short and simple guide basically to get the diagrams out. I am not responsible for these mods. I did not create them. Use them at your own risk.
You need a variable resistor (VR) about 1 Kohm
Voltage Chipset Mod
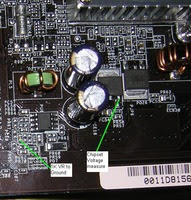
The chipset voltage is measured from the right leg of mosfet shown in picture below.Default voltage is around 1.55v. This mod will increase chipset voltage by tuning the variable resistor (VR). Take note that the chipset does get quite hot so be sure to give it good cooling.
The mod is very simple. The picture above shows all the information you need. Solder the 1K variable resistor (VR) to the smd resistor shown in the picture and then solder the variable resistor to ground. The resistor has 3 legs. Use any of the outer legs and solder it to smd from the photo above. Then solder the middle leg to ground (you can use and the middle leg from mosfet).
Note: Use only ONE outer leg from resistor and not both of them and DO NOT solder smd resistor straight to ground because this will kill the chipset.
After soldering set VR at maximum resistance (use a digital multimeter). This will increase chipset voltage to 1.7v. Then adjust that voltage by turning the VR you soldered on.
From some tests, if you use a 10Kohm VR resistor, you can get up 1,85v. For safe mode, put the resistor at 3Kohm (use the multimeter) and you will get around 1,80v.
