Ethereum is a blockchain network, like Bitcoin, but with many differences.
Ethereum is a decentralized blockchain protocol that performs smart contracts: applications that run exactly as planned, without any possibility of production cancellation, censorship, fraud or third party intervention. Ether is the integrated currency unit of the Ethereum platform. For further information please visit the official forum.
Its current price at the time this article was written is $274.70 or BTC 0.079.
Ethereum can be mining by using GPUs, so the ASIC miners used in Bitcoin can not be used here. That is, your computer is ready for Ether mining.
In this guide, we'll see how it works in Windows, as most users use them. The guide covers Windows 7 and 10.
Note that in the guide I used nanopool.org. Alternatively, you can use ethermine.org, but you will need to change the pool address in the miner's settings.
Programs needed
Before start, you'll need to install the latest driver card editions for your NVIDIA and AMD graphics cards.
Next, you will need to download and install the developer Kits (don't worry, you don't have to program anything) for NVidia (openCL CUDA package) or AMD (openCL SDK Package), depending on the graphics card you have on your computer.
You also need to download the Microsoft Redistributables package and install it too.
Finally, you will need the geth and ethminer programs. Ethminer is up to date in its latest release and has full support for Nvidia GeForce GTX 1060 GPUs.
Mining
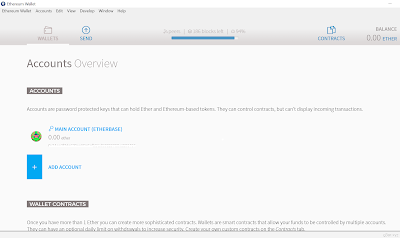
To get started, you need to download the Ethereum wallet from here, depending on your Windows version (32/64). In this guide, the "Ethereum-Wallet-win64-0-8-10" version was used.
Unzip the downloaded package and run the "Ethereum Wallet.exe" file and wait until it synchronizes with the block chain. If you are prompted by the firewall, enable the connection. It will take a long time depending on your connection speed (the file is about 11GB).
When finished with synchronization, the wallet will open and you will be prompted to create a new account where you simply enter a password.
You have to remember this password, as you will not be able to restore it in another case. When you're finished, you're almost ready to start mining.
In case you want to save your key, go to the folder:
C:/users/username/appdata/roaming/ethereum/
And save the "keystore" folder from there. So, if you want to format your PC or decide to have the mining on another computer, simply drag the folder into the same place and you are ready to run the wallet again (you will be asked again for the password you entered previously on order to open the wallet).
Now you have to unpack the "geth" file into an easily accessible folder (eg D:/Ethereum). Transfer its contents to the main folder (D:/Ethereum) and not to the new folder that is already created (eg D:/Ethereum/go-ethereum-1.x.x).
In the (D:/Ethereum) folder, right-click to create a new text file and name it ethe.bat or whatever you want. Be carefull to have the .bat extension and not the .txt. Open it with a word processor, add the line below and save it.
geth --rpc
Now unzip the "ethminer" file in the same way, where its files should also be in our main folder (D:/Ethereum). Re-create a new file and name it ethminer.bat or whatever you want (note the .bat extension).
Open this file with a text editor, preferably notepad ++ and put the following:
setx GPU_FORCE_64BIT_PTR 0

setx GPU_MAX_HEAP_SIZE 100

setx GPU_USE_SYNC_OBJECTS 1

setx GPU_MAX_ALLOC_PERCENT 100

ethminer.exe -F http://us-west1.nanopool.org:8888/wallet_address -G --farm-recheck 200 --cl-local-work 256 --cl-global-work 8192
Where "wallet_address" put your unique wallet number that can be found under the "Main Account" in the wallet's main window, next to the key icon, or by clicking on "Main Account" and choosing "Copy Address" from the right menu.
To start mining, you should first run ethe.bat and then the ethminer.bat file. The ethe.bat file serves to synchronize with the block chain. The same job does the wallet every time it runs, so choose which way you want to use.
So mining should begin. If you see the speed is not changing or is stuck at 0/0 H/s, do not close it because it is very likely to synchronize the data. Just let it done its job.
To check the state of your mining, go to nanopool.org and put there your wallet address. Your account will not appear if you have not made at least 1 share.
To automatically run the miner every time Windows starts, create a new shortcut to the ethminer.bat file and add it to the Windows startup folder.
Before you start mining, consider whether you get profit from this, as using fast GPUs, which already cost a lot of money, and also use them to their full speed, requires increased power consumption.


