Using FlashMe to update your DS firmware
warning- DO NOT SHUT THE DS OFF IN THE MIDDLE OF THIS, ONCE STARTED - FINISH!!
If you follow this guide you should have little to no problems (it seems the biggest problem is finding something that will short SL1 - I use a precision screwdriver as often the SL1 contacts have resin on them from manufacture, you may need to rub it off with the screwdriver to get a good contact).
If you have a new DS firmware and PassMe2, you will also need to refer to this information to boot using the PassMe2:
If you did not have FlashMe on your DS before:
1 - get the Installation file from http://ds.gcdev.com/dsfirmware/
2 - copy the installation file "flashme.nds" to your CF/SD card
3 - gather proper materials and make these preparations:
- plug your DS into the wall
- remove the battery cover (not the battery though)
- have something metal handy that will fit into the hole pictured at http://ds.gcdev.com/dsfirmware/
4 - insert your SuperPass (or PassMe) into the DS slot with a game in it.
5 - put your SuperCard into the GBA slot
6 - turn on the DS
7 - select and run flashme.nds from the SuperCard menu
8 - when it asks, press the keys in the order it says
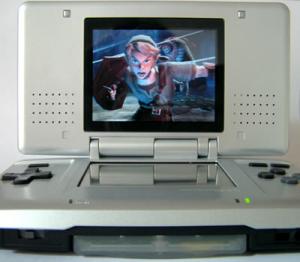
9 - it should now say 0%, carefully tip your DS on it back or side and short the contact under the hole shown in the above sites image, the image on the right is the hole, the image on the left is what you are actually shorting on the circuit board
10 - if it stops keep trying your metal object until it reaches 100% and tells you it is done. With some patience and the right screwdriver/fork/nail/toothpick with tinfoil on it - or whatever you can get, this does not take long (10-20 seconds)
11 - turn off your DS. Note the boot buttons: ABXY while turning on the DS is forcing it to act like a PassMe is inserted, START+SELECT+A+B is the DS firmware recovery mode in case something happens to your DS's firmware.
If you have done FlashMe before:
If you are upgrading from V4 or older of FlashMe, you will need to do the above procedure, but you can boot the DS using ABXY instead of needing the SuperPass.
1 - get the Installation file from http://ds.gcdev.com/dsfirmware/
2 - copy the installation file "flashme.nds" to your CF/SD card
3 - turn on the DS while holding ABXY (if your DS's firmware was trashed and the DS isnt working, see note2 below)
4 - from the menu select and run "flashme.nds"
5 - you should not need to short SL1, it will only need to write the unprotected portion of the memory and it does so fairly quickly (unless you are upgrading from V4 or lower to V5, SL1 will need to be shorted in this case)
Note:
There is an alternate Flashme file available at that site "flashme_stealth.nds" - it does the same as flashme.nds BUT it leaves the origional Nintendo logo screen as well as the health/safety warning intact so your DS will not appear to be modified.
Note2:
So something trashed your FlashMe'd DS firmware and you only have a SC to fix it...
- Put the flashme.nds as above onto your CF/SD card (preferably on an empty card), and boot using START+SELECT+A+B
- press A and wait a few seconds and the firmware app should load up. Follow its instructions and you should be back up and going no problem.


